Friday, 1 March 2019

How to Disable/Turn off Voicemail on iPhone (2019)

How to Disable/Turn off Voicemail on iPhone (2019)

If you are an iPhone lover, you must have seen the voicemail feature. Most people who rely on this feature are able to schedule appointments and contact their clients. Therefore, this feature is quite helpful when it’s activated. However, sometimes you may want to disable the voicemail on your iPhone for instance when traveling to a foreign country.

In other cases, for those using the iOS 10, 11, 11.1, and 11.3, the voicemail feature can sometimes be a problematic. Most of the users say that the voicemail screen sometimes can jam up hence making it hard to move to the next voicemail. This has prompted the need to disable voicemail on iPhone. If you are experiencing any of the above problems and want to disable voicemail, this part is for you.

In this article, therefore, you can follow the simple steps on how to disable voicemail on iPhone whenever you want to travel and any relevant information that will help you handle your voicemail system effectively without any extra charges. If by any chance you are unable to disable the iPhone voicemail feature, please contact the customer support of your service provider to help you through.


Tip 1: How to Disable Voicemail iPhone Feature


Tip 2: How to Turn off Voicemail Password on iPhone


Tip 3: How to Disable Voicemail Transcription on iPhone


Tip 4: Ask Your Carrier for Help
How to Disable Voicemail iPhone Feature

If you are tired of the extra charges due to voicemail, here is a simple procedure listed to help you disable the voicemail on iPhone:


Start by tapping on the phone icon found at your iPhone’s home screen. Next, enter the numbers *#62# then call the number so that you are able to determine your voice mailbox number. Note the number down on a piece of paper or memorize it if you are good with numbers.


Go to the setting section on your iPhone. As soon as the menu opens, tap on the phone icon and then go to the call forwarding section. At this point, type the voice mailbox number on the space that will be provided and then you can now exit after saving the settings.


Now, you can go to the keypad on your phone and then type the number #404 and then call so that you are able to turn off voicemail on iPhone. Afterward, you can try to call your voicemail box just to confirm if you have new messages.


You also have the option of enabling divert call on your iPhone in case you wish. When you have disabled the voicemail, you can dial #61# hence your phone will have a ‘no answer’ response if anyone is trying to reach you. You also have the option of dialing 67 for user busy response.


If you wish to reactivate the voice mailbox feature, you can dial 004# and call.


How to Turn off Voicemail Password on iPhone

When the inbox of the voicemail messages is set up, the available passwords are turned on by default. This feature is set in place to protect all the voicemail messages from other parties. In most cases, the carriers will not recommend that you turn off the passwords but most of the times if you keep on forgetting the passwords it is best that you turn it off.

The procedure below will help you to turn off the passwords and then turn it on later.

Step 1: Start by calling the system of the voicemail. From the keyboard of your iPhone, press then hold on key number one. You may also consider pressing then holding on the voicemail key too.

Step 2: Enter the password of your voicemail. In case you are prompted, you should enter the password of your inbox voicemail. If you have forgotten the password you may have to reset it first before proceeding.

Step 3: Proceed to the main menu by skipping the part where you have to listen to messages. This will require you to press the * button. From there, you should choose the administrative options.

Step 4: Select the password options. Tap on the key that says turn off the password then proceed by following the given prompts. These prompts always differ depending on the carrier, therefore, it is necessary that you are keen enough to avoid mistakes.


How to Disable Voicemail Transcription on iPhone

Most times the transcription is based on Canadian English and U.S English hence you can only change the language. Go to the settings then change Siri language to any other language that doesn’t sound like English. The end result will show that the transcription is unavailable.


Ask Your Carrier for Help

If you are not able to follow the above procedure, you can dial *611 to contact iPhone providers for help or you can contact your service’s toll number.


T-Mobile: 1-877-453-1304


Verizon: 1-800-922-0204


AT&T: 1-800-331-0500


Sprint: 888-211-4727

In conclusion, with the above descriptions, hope you now have the chance to control your voice mailbox effectively. Use the above steps in case you want to turn off/disable your voicemail. If unfortunately you lose some data while doing this, you may need a professional iOS data recovery tool. Feel free to leave comments below.Sponsor ads:

Gihosoft Free iPhone Data Recovery:https://www.gihosoft.com/iphone-data-recovery-free.html

Gihosoft iPhone Data Recovery Free

Free iPhone Data Recovery Software for Windows/Mac

Recover up to 12+ types of files, including contacts, SMS, photos, WhatsApp, Viber, notes, etc.

Restore lost data from iOS devices directly or from iTunes and iCloud backup

Recover iPhone data lost due to iOS upgrade/jailbreak, accidental deletion, device lost or broken

Support all the latest iPhone, iPad and iPod Touch

Both Free and Pro version.

If you lost data after you updated to a new iPhone, you can always use Gihosoft iPhone Data Recovery to get the data back from the old iPhone or backup.You may also like: iphonerecovery.com

If you use android phones, please choose Gihosoft Android Data Recovery.

With Gihosoft Android Data Recovery, no longer afraid of data loss!

Must read:Youtube video downloader for pc

Gihosoft RePicvid Free Photo Recovery Software provides a free photo recovery software for windows to help users recover the deleted or lost photo for free.

Jihosoft Android Data Recovery: the best Android Data Recovery software for Windows and Mac to recover deleted contacts, messages, photos, videos, WhatsApp and etc from Android devices.Tips:How to transfer messages from iPhone to iPhone

jihosoft Free iPhone Data Recovery

Thursday, 28 February 2019

Solved: How to Fix iCloud Photo Sharing not Working


Solved: How to Fix iCloud Photo Sharing not Working
iCloud Photo Sharing allows you to share photos and videos with family and friends anywhere on all your iOS devices. It's also a safer way than uploading your pictures to Facebook or Instagram, since it's encrypted and your images will only shared with the people you've invited instead of the public. However, sometimes you will find iCloud Photo Sharing is not working, you can't see the photos or photos not uploading to the shared album.

The following article will show you the methods that one can fix problems of iCloud photo sharing not working.


Method 1: Make Sure iCloud Photo Sharing is Enabled


Method 2: Check Your Network Connection


Method 3: Sign out and in Your iCloud Account


Method 4: An alternative to Transfer Photos from iPhone to PC with TunesMate
Method 1: Make Sure iCloud Photo Sharing is Enabled

If your iCloud Photo Sharing is not working, it is simple to check the status of iCloud Photo Sharing by following these steps.
On iPhone:


Check the status of iCloud Photo Sharing by > Open Settings App


Select iCloud from the menu.


Select the app using iCloud > Tap on Photos.


If the photo features are not switched to green, slide them to the right so that they turn on.


On Mac:Also Read:How to Remove RAR Password Online in Windows without Software 2019
Also Read:Top 15 Best Sites Like FMovies for You to Download Movies and TV Shows 2019


Open Photo App on your Mac.


Click on "Photos" from the menu bar.


Choose "Preferences" from the drop-down menu.


Click "iCloud" tab.


Check the box of "iCloud Photo Sharing".


On Windows:


Download iCloud on your Windows computer.


Open iCloud and click “Options” beside “Photos”.


Check the box for “iCloud Photo Library”.


Click Done, then click Apply.
Method 2: Check Your Network Connection

iCloud Photo Sharing not working may be because of unstable network. Please make sure you have a stable Wi-Fi or Cellular network, it helps iCloud Photo Sharing works well.
Method 3: Sign out and in Your iCloud Account

If iCloud Photo Sharing not upgrading, you can try to sign out your iCloud account and re-sign in again to fix this issue and see whether it is solved.
Method 4: An alternative to Transfer Photos from iPhone to PC with TunesMate

iMyFone TunesMate allows you to seamlessly transfer your media files between iPhone and iTunes/PC when iCloud photo sharing not working. It allows you to sync iTunes library without forcing you to erase previous data. In addition, TunesMate allows you to transfer music videos, ringtones, podcasts and various other files.Sponsor ads:

Gihosoft Free iPhone Data Recovery:https://www.gihosoft.com/iphone-data-recovery-free.html

Gihosoft iPhone Data Recovery Free

Free iPhone Data Recovery Software for Windows/Mac

Recover up to 12+ types of files, including contacts, SMS, photos, WhatsApp, Viber, notes, etc.

Restore lost data from iOS devices directly or from iTunes and iCloud backup

Recover iPhone data lost due to iOS upgrade/jailbreak, accidental deletion, device lost or broken

Support all the latest iPhone, iPad and iPod Touch

Both Free and Pro version.

If you lost data after you updated to a new iPhone, you can always use Gihosoft iPhone Data Recovery to get the data back from the old iPhone or backup.You may also like: iphonerecovery.com

If you use android phones, please choose Gihosoft Android Data Recovery.

With Gihosoft Android Data Recovery, no longer afraid of data loss!

Must read:Youtube video downloader for pc

Gihosoft RePicvid Free Photo Recovery Software provides a free photo recovery software for windows to help users recover the deleted or lost photo for free.

Jihosoft Android Data Recovery: the best Android Data Recovery software for Windows and Mac to recover deleted contacts, messages, photos, videos, WhatsApp and etc from Android devices.Tips:How to transfer messages from iPhone to iPhone

jihosoft Free iPhone Data Recovery

How to Fix Pinterest App not Working on iPhone?


With over 200 million monthly active users, Pinterest has gone from being an optional app on most iPhones to becoming a major competitor for memory space on these gadgets with its visual information discovery functionality. This functionality has made the app very popular among creatives.

As with all apps, there is a need for continued solution support as all users cannot be satisfied all the time. Some user issues appear so serious that they complain about the Pinterest app not working on their iPhones/iPads.
Part 1: How to Fix Pinterest App not Working on iPhone?
1. Pinterest Boards not Showing up on iPhone

Some users complain of literally watching their Pinterest boards and pins disappearing overnight from their account. This can be really sad and annoying as users have invested valuable time and energy in building and managing those data only to have them disappear in a day.

The reason for this can be that the account has been flagged due to spamming or pornography, or if you have consistently exceeded the Pinterest limit on following, unfollowing or pinning. Thirdly, your account could have been hacked or the Pinterest app might be experiencing a glitch. The only fix is to either wait for a while to see if it might be resolved automatically, or to contact the Pinterest Support Desk.
2. Pinterest not Loading on iPhone

Some other users have complained of having their Pinterest pictures or images not loading on their iPhones or iPads while loading perfectly on their laptops. This can be an issue for most users that operate their businesses off the app as it becomes more evident that the Pinterest app is not working on these specific gadgets.

The recommended fix to this issue would be to contact your service provider or considering manually switching your router’s DNS to confirm if the issue is from Pinterest or from your service provider.

Method 1: Clear cache and browser history

1. On your Pinterest app, click the Profile tab

2. In the Profile tab, click the Setting (Nut) icon close to the + sign

3. In the Settings tab, click Edit Settings

4. Select Clear browsing history and Clear cache

Method 2: Disable Location Service and switch off Background App Refresh

Most apps remain active in the background even when closed. Switching off this background setting can resolve the Pinterest app not working on iPhone issue as it reduces battery, data and memory consumption. To do this go to Settings > General > Background App Refresh, toggle it off. In that same location, toggle off Location Services.
3. Pinterest Freezing on iPad/iPhone

This is an occurrence that various users have complained about as the Pinterest app suddenly hangs or freezes, thus leading to frustration or anger. To resolve these issues, try the below fixes.

Method 1: Restart the app

Double tap the Home button; Identify the Pinterest app and swipe it up; Return to your Home screen and launch the Pinterest app once more.

Method 2: Restart your iPhone

Long press the power button

Move the slider in the suggested direction

After the device has gone off, long press the power button to restart the iPhone

Method 3: Update the Pinterest app

Your app might be out of date should your Automatic Update option be set off. So, in your App Store, search and update the Pinterest app.
4. Pinterest Keeps Crashing on iPad/iPhone

Other times, the Pinterest app has been reported to abruptly crash and exit during use. This can be annoying as users lose any unsaved data and have to struggle to regain that information. To resolve the Pinterest crashing on iPhone issue, consider doing the below.

Method 1: Terminate all unused apps

Some apps might be running in the background, thus consuming vital memory space that might be needed to effectively sustain the Pinterest app's use. To terminate unused apps:

Double-click the Home button

Once it reveals the running applications, swipe them up to close them.
5. Pinterest Won't Reset Password

For many creatives and designers who constantly use the application, it becomes almost second nature to frequently switch between your personal account and your business account. This has become a problem in recent times as some users are complaining about Pinterest not allowing them to log into their accounts by saying they have entered the wrong password.

To worsen matters, all attempts to contact Pinterest for assistance proved abortive as it was their automated help desk that responded.
Part 2: Best Fix for the Pinterest App not Working on iPhone/iPad Issue

Sponsor ads:

Gihosoft Free iPhone Data Recovery:https://www.gihosoft.com/iphone-data-recovery-free.html

Gihosoft iPhone Data Recovery Free

Free iPhone Data Recovery Software for Windows/Mac

Recover up to 12+ types of files, including contacts, SMS, photos, WhatsApp, Viber, notes, etc.

Restore lost data from iOS devices directly or from iTunes and iCloud backup

Recover iPhone data lost due to iOS upgrade/jailbreak, accidental deletion, device lost or broken

Support all the latest iPhone, iPad and iPod Touch

Both Free and Pro version.

If you lost data after you updated to a new iPhone, you can always use Gihosoft iPhone Data Recovery to get the data back from the old iPhone or backup.You may also like: iphonerecovery.com

If you use android phones, please choose Gihosoft Android Data Recovery.

With Gihosoft Android Data Recovery, no longer afraid of data loss!

Must read:Youtube video downloader for pc

Gihosoft RePicvid Free Photo Recovery Software provides a free photo recovery software for windows to help users recover the deleted or lost photo for free.

Jihosoft Android Data Recovery: the best Android Data Recovery software for Windows and Mac to recover deleted contacts, messages, photos, videos, WhatsApp and etc from Android devices.Tips:How to transfer messages from iPhone to iPhone


jihosoft Free iPhone Data Recovery

How to Update iOS Without WiFi? 3 Ways Offered (iOS 12 Supported) 2019

How to Update iOS Without WiFi? 3 Ways Offered (iOS 12 Supported) 2019

Many times, we suffer with an unstable Wi-Fi or a service outage in our area, so that Wi-Fi fails to work properly. This could be frustrating and especially when there is a new update available in the iPhone and you really want to install it as soon as possible. Well! If you are in this situation, it is understood that updating to the latest iOS (iOS 12 for now) without WiFi has become essential for you by now. You can read this article and get help from it. We will answer your question that 'can you update iOS without Wi-Fi or not'? Keep scrolling and find the solutions.


1. Can You Update iOS without Wi-Fi?


2. Update iOS Using iTunes without Wi-Fi


3. Update iOS Using Cellular Data


4. Update iOS using a Third-party Tool without Wi-Fi
1. Can You Update iOS without Wi-Fi?

If you're not having a proper Wi-Fi connection or don't have a Wi-Fi at all to update iPhone to the latest version iOS 12, don't bother, you can certainly update it on your device without Wi-Fi. However, please note that you will need other internet connection than Wi-Fi for an update process. Please make sure your computer has been connected to network or you have mobile data to proceed for the process. Also, please check if your device is having enough storage to get the newest update iOS 12 since the process eats lots of space.
2. Update iOS Using iTunes without Wi-Fi

The first way through which you can update iOS without Wi-Fi is using iTunes. Please ensure that you have a backup of your data before proceeding to the steps since the existing data might get lost after the updating. In addition, make sure that iTunes has been updated to the latest version on your PC. Now, follow the steps to update your iPhone into latest iOS which is iOS 12 for now.


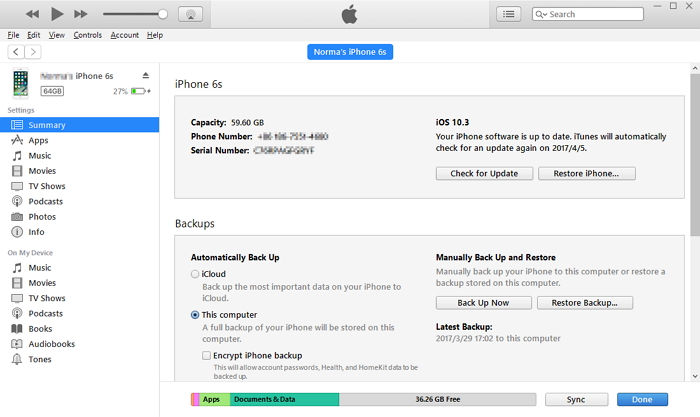
Launch iTunes in PC and make connection between iPhone and PC using USB cord.


Choose the device icon at the top left and hit on 'Summary' tab.


Click on 'Check for Update' now followed by 'Download and Update'.


Type in passcode if prompt and your device will get updated in a while.


3. Update iOS Using Cellular Data

As said above, updating your iPhone to the new update iOS 12 will always calls for an internet connection, so here is the next way to update iOS without Wi-Fi and that is updating via cellular data. Make sure to have enough data plan in your device since the updating process consumes a lot of data. Also, ensure that your device's battery is not less than 50%. Once checking all this, read the following steps to update your iPhone.


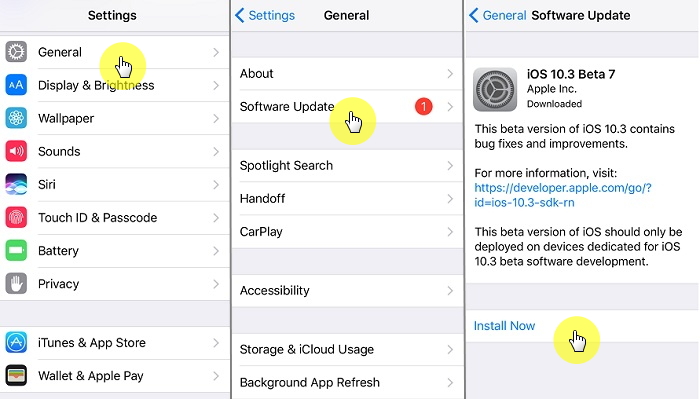
Firstly, turn on the cellular data and open 'Settings' in your device.


Go to the 'General' option and tap it.


Now, look for 'Software Update' and tap on it. Your iPhone will follow your command and will look for the update and will inform you. After this, tap on 'Download and Install' button and follow the prompts.


Now, the updating process will begin and on completion of downloading, a pop-up will ask you to install the iOS right now or later. Tap 'Install Now' and your installation will start. Now iOS 12 is available.


While installing, your iPhone's screen will go black showing Apple logo and the installation status. Once finishing installation, the device will restart and then you will be asked to enter the passcode. Type in your passcode and you're good to go. You can use your device now with the latest iOS update in it.


4. Update iOS using a Third-party Tool without Wi-Fi

Here is the next best option you can try if you want to update iPhone without Wi-Fi. An expert third-party tool like iMyFone D-Backcan always help you but remember that internet connection is also needed. D-Back is basically a professional and efficient data recovery tool that has been recommended by the famous media sites like Macworld and Makeuseof. It is completely free of any harmful virus and secure to use. On a plus, there is no need to panic about your data since this tool promises no data loss while updating or fixing any iOS issue such as iPhone stuck on Apple logo/recovery mode/white screen/black screen, freezing issues and so on. You can use it easily and following are the steps to use this tool.Sponsor ads:

Gihosoft Free iPhone Data Recovery:https://www.gihosoft.com/iphone-data-recovery-free.html

Gihosoft iPhone Data Recovery Free

Free iPhone Data Recovery Software for Windows/Mac

Recover up to 12+ types of files, including contacts, SMS, photos, WhatsApp, Viber, notes, etc.

Restore lost data from iOS devices directly or from iTunes and iCloud backup

Recover iPhone data lost due to iOS upgrade/jailbreak, accidental deletion, device lost or broken

Support all the latest iPhone, iPad and iPod Touch

Both Free and Pro version.

If you lost data after you updated to a new iPhone, you can always use Gihosoft iPhone Data Recovery to get the data back from the old iPhone or backup.You may also like: iphonerecovery.com

If you use android phones, please choose Gihosoft Android Data Recovery.

With Gihosoft Android Data Recovery, no longer afraid of data loss!

Must read:Youtube video downloader for pc

Gihosoft RePicvid Free Photo Recovery Software provides a free photo recovery software for windows to help users recover the deleted or lost photo for free.

Jihosoft Android Data Recovery: the best Android Data Recovery software for Windows and Mac to recover deleted contacts, messages, photos, videos, WhatsApp and etc from Android devices.Tips:How to transfer messages from iPhone to iPhone

jihosoft Free iPhone Data Recovery

My iPhone was Stolen, How Do I Erase Everything?


How to erase stolen iPhone is a common topic on most blogs and website pages, but the truth is that many of the solutions proffered by tech professionals and bloggers are not very helpful. You may have clicked away from many articles on this topic because the content has no solution in it.

We shall be hitting the nail on the head by going straight to the most efficient solutions on how to erase iPhone’s data when lost or stolen.

Sponsor ads:Odin Flash Tool for Samsung Devices

Sponsor ads:Top 7 Best Websites to Convert AVI to MP4 Free Online 2019


Part 1: My iPhone was Stolen, How Do I Erase Everything?


Part 2: How to Permanently Erase iPhone for Privacy Protection
Part 1: My iPhone was Stolen, How Do I Erase Everything?

If you’re certain that your iPhone wasn’t misplaced but stolen, there are many ways you can erase it to prevent the thief from using your valuable data and information against you.

However, you need to know if “Find My iPhone” was enabled on your missing iPhone or not.
Solution 1: If “Find My iPhone” Is Enabled on The Stolen Device

When your iPhone is lost or stolen and Find My iPhone is turned on, then you still have some chances to recover your device or erase it remotely to protect your information and privacy.

Sponsor ads:Best 5 Android Apps to Change Photo Backgrounds

Sponsor ads:5 Best Video to MP3 Converter to Extract Audio from Video Files

Sponsor ads:How to Go Live on Tik Tok/Musical.ly in 2019

Here is how to erase stolen iPhone and keep your information safe with Find My iPhone:

Step 1: Log in to www.iCloud.com with a friend’s or family member’s iPhone, iPad, or iPod touch, or computer.

Step 2: To find your lost or stolen device, open Find My iPhone, and click on the stolen iPhone to view its location on the map. You can make it play a sound to see if it’s nearby.

Step 3: Turn on Lost Mode to remotely lock your device, display a message with your phone number on your stolen iPhone’s lock screen, and track your iPhone location.


Step 4: Erase your iPhone to prevent anyone from accessing your data, credit card information, and other information. Click “All Devices” then select the iPhone you would like to erase, then click “Erase iPhone”. Enter the necessary verification requirements, and your stolen iPhone will be remotely erased.
Solution 2: If “Find My iPhone” Isn't Enabled on Your Missing Device

The fact is that Find My iPhone is Apple’s only service that can help you to track or locate your lost/stolen iPhone. Hence, if this service isn’t enabled before you lost your iPhone, there is no other Apple service that can help you to erase stolen iPhone.

But there are a few things you can do to prevent greater danger and harm to your privacy:

Step 1. Change your Apple ID Password by following these steps:


Sign in to your Apple ID Account Page.


Go to the security section and click “Change Password”.


Enter your current password, then the new password in the first and second box to confirm it.


Click “Change Password”.


Step 2. Change the password to other internet accounts that are open on your iPhone.

Step 3. Report your lost or stolen iPhone to the appropriate local law enforcement agency.

Step 4. Report your lost iPhone to your wireless network carrier to disable your account.Sponsor ads:

Gihosoft Free iPhone Data Recovery:https://www.gihosoft.com/iphone-data-recovery-free.html

Gihosoft iPhone Data Recovery Free

Free iPhone Data Recovery Software for Windows/Mac

Recover up to 12+ types of files, including contacts, SMS, photos, WhatsApp, Viber, notes, etc.

Restore lost data from iOS devices directly or from iTunes and iCloud backup

Recover iPhone data lost due to iOS upgrade/jailbreak, accidental deletion, device lost or broken

Support all the latest iPhone, iPad and iPod Touch

Both Free and Pro version.

If you lost data after you updated to a new iPhone, you can always use Gihosoft iPhone Data Recovery to get the data back from the old iPhone or backup.You may also like: iphonerecovery.com

If you use android phones, please choose Gihosoft Android Data Recovery.

With Gihosoft Android Data Recovery, no longer afraid of data loss!

Must read:Youtube video downloader for pc

Gihosoft RePicvid Free Photo Recovery Software provides a free photo recovery software for windows to help users recover the deleted or lost photo for free.

Jihosoft Android Data Recovery: the best Android Data Recovery software for Windows and Mac to recover deleted contacts, messages, photos, videos, WhatsApp and etc from Android devices.Tips:How to transfer messages from iPhone to iPhone

jihosoft Free iPhone Data Recovery
Best Free iPhone WhatsApp Database Reader 2019


Best Free iPhone WhatsApp Database Reader 2019
"Hi, this is James! I need to know how I can read my WhatsApp chat history if I've an iTunes backup. Actually I deleted my chats a week ago for some reason and now I want some of those. Is there any WhatsApp database viewer? Please assist me how can i get them back. I really appreciate that."

Reading WhatsApp messages in backup files is not difficult if you have a suitable iPhone WhatsApp database reader. Basically, all your WhatsApp chats get saved in unreadable files if you've made backup of those chats using iTunes. You can then use a WhatsApp database reader and read those messages effortlessly or can also restore them if you wish. In this article, we will introduce you one of the best WhatsApp database viewer that will enable you to view your important chats again. It is totally free to achieve this purpose.


1. The Location of iPhone WhatsApp Database on Your Computer


2. Best Free iPhone WhatsApp Database Reader
1. The Location of iPhone WhatsApp Database on Your Computer

Before you view the WhatsApp database, make sure that you have WhatsApp database on your computer. The database files of iPhone WhatsApp are 7c7fba66680ef796b916b067077cc246adacf01d and ec50dd986a0f35953e40f6ca9602ad78173e254f . If you have made an iTunes backup and you never change the path of the backup files, then you can easily find the exact location of iPhone WhatsApp database stored on your computer by following the instruction below. If you move the backup files to another location, just move them back, Here in this section we are going to make you aware about the exact place where your database files are stored.

For Windows Users:

Below mentioned is the path where all your iTunes backups are stored, including the iPhone WhatsApp database backup too.

\Users\(username)\AppData\Roaming\Apple Computer\MobileSync\Backup\

To follow the path and get into this folder, simply follow the guide mentioned below.


First, launch the 'Run' box on your computer. Tap both the Windows button and letter 'R' at the same time.


Now, in the Run box, type in " %appdata% " (without inverted commas) and hit on 'OK' button.


Next, double click to open the 'Apple Computer' folder and then get into 'MobileSync'. Lastl, open the 'Backup' folder and that's it!


For Mac Users:

It is relatively easier for a Mac user to find the below mentioned location. They just have to search it in their Spotlight search, that's it!

~/Library/Application Support/MobileSync/Backup/

Simply follow the steps as mentioned below to get into the Backups folder:


Launch the 'Spotlight' search on your Mac and copy & paste the aforementioned path into it. Then hit 'Return' key on their keyboard.

Or alternatively,


Launch iTunes and tap on iTunes option from the menu bar. Now, hit on 'Preferences'.


Get under the 'Devices' section and 'right-click' on any backup file entry under 'Device Backups'. Then hit on 'Show in Finder'.


2. Best Free iPhone WhatsApp Database Reader

You will now get acquainted with the matchless WhatsApp database viewer which is iMyFone D-Port Pro. This is essentially a data backup and restore tool for iOS devices which supports even the latest iOS version i.e. iOS 11.3. It's a professional tool that supports full or selective backup and restore function. Moreover, it can also view, or export more than 19 types of data from your iCloud or iTunes backup and even iPhone. Let's now understand how to use this WhatsApp database reader for different purpose.
The Steps on How to View WhatsApp Database in iTunes Backup

If you just want to view WhatsApp database in iTunes backup, you can do it in a free way although you need purchase iMyFone D-Port Pro if you want to use the other features.Sponsor ads:Movie4k Alternative Websites for Movie Streaming
Sponsor ads:Top 10 iPhone Receipt Tracking Apps to Scan & Manage Your Receipts 2019

How to Delete Twitter Account on iPhone? Learn the Best Way

How to Delete Twitter Account on iPhone? Learn the Best Way

Twitter is a fun and exciting platform but if you think that your days of sharing photos, tweeting out jokes, and retweeting have come to an end, then perhaps it is time to delete your Twitter account. There are a number of ways to delete/deactivate Twitter account on iPhone.


Part 1: How to Delete Twitter Account on iPhone?


Part 2: How to Deactivate Twitter Account on iPhone?


Part 3: How to Permanently Delete Twitter Data Fragments?
How to Delete Twitter Account on iPhone?

Deleting Twitter account is a straightforward process. If you are using Twitter app, you will need to sign out from the app first and then use Settings app to delete the account. Here is how to delete twitter account on iPhone app:

Step 1. Launch Twitter app on your iPhone.

Step 2. Tap the gear button and then tap Sign Out. You will need to confirm your action by tapping Sign Out again.

Step 3. After that, open Settings app on your iPhone and scroll down to find Twitter icon.

Sponsor ads:Top 7 Best Superhero wallpaper Apps for Android 2019

Also Read:Receive SMS Online for Free via Temporary Phone Numbers

Step 4. Tap the Twitter icon and then choose the account (if you have multiple accounts) you wish to delete.

Step 5. After selecting the account, tap the Delete Account option, it will be shown at the bottom of the interface.

Step 6. Tap Delete Account again to confirm your action. Your Twitter account will now be deleted from your iPhone.


How to Deactivate Twitter Account on iPhone?

You cannot deactivate your Twitter account from the Twitter app. You will need to use a web browser such as Safari, Chrome, Firefox, etc. to do this. Follow these instructions to deactivate Twitter account on iPhone:

Step 1. Launch your favorite web browser on your iPhone.

Step 2. Visit twitter.com and then log in to your Twitter account.

Step 3. Once you are logged in, navigate to Account Settings by tapping on your profile photo. It will be shown at the top right corner of the webpage.

Step 4. Now find and choose Settings and then scroll to the bottom of the webpage. There, you will find an option named Deactivate My Account. Select this option.

Step 5. A new webpage with a Deactivate [Your Username] will open. Follow the on-screen instructions to proceed.

Step 6. You will need to enter your Twitter password in order to deactivate your account. Once you enter your password, your Twitter account will be deactivated within a few minutes.


How to Reactivate Twitter Account on iPhone?

Just like many other social media services, Twitter account does not get deleted at once, instead you are given a 30-days period so you can reactivate the account if you change your mind.

Follow these instructions to reactivate your Twitter account:


Launch your favorite web browsing app on your iPhone.


Visit twitter.com.


Now log in as normal using your email or username and password.


Once you are logged in, your Twitter account will automatically be reactivated. You don’t need to perform any additional steps.


If you get an error that recovery is temporarily disabled, then wait for a few minutes and try again.
Sponsor ads:Perfect Samsung Smart Switch Alternatives for Data Transfer

Sponsor ads:Budget and Expense Tracking Apps for iPhone/iPad in 2019


Sponsor ads:

Gihosoft Free iPhone Data Recovery:https://www.gihosoft.com/iphone-data-recovery-free.html

Gihosoft iPhone Data Recovery Free

Free iPhone Data Recovery Software for Windows/Mac

Recover up to 12+ types of files, including contacts, SMS, photos, WhatsApp, Viber, notes, etc.

Restore lost data from iOS devices directly or from iTunes and iCloud backup

Recover iPhone data lost due to iOS upgrade/jailbreak, accidental deletion, device lost or broken

Support all the latest iPhone, iPad and iPod Touch

Both Free and Pro version.

If you lost data after you updated to a new iPhone, you can always use Gihosoft iPhone Data Recovery to get the data back from the old iPhone or backup.You may also like: iphonerecovery.com

If you use android phones, please choose Gihosoft Android Data Recovery.

With Gihosoft Android Data Recovery, no longer afraid of data loss!

Must read:Youtube video downloader for pc

Gihosoft RePicvid Free Photo Recovery Software provides a free photo recovery software for windows to help users recover the deleted or lost photo for free.

Jihosoft Android Data Recovery: the best Android Data Recovery software for Windows and Mac to recover deleted contacts, messages, photos, videos, WhatsApp and etc from Android devices.Tips:How to transfer messages from iPhone to iPhone


jihosoft Free iPhone Data Recovery
Apple Using Tencent’s Safe Browsing for Malicious Website Warnings in Safari on iOS 13 Which Logs IPs

Apple has primarily always relied on Google’s Safe Browsing technology for Safari’s ‘Fraudulent Website Warning’ feature. However, it seems ...